Hi all my crafting buddies,
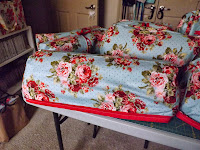
Today's show and tell... Dust Covers! My original goal was just to make a cover for my Pazzles; however and for no apparent reason I started with my Cricut Expression (that already has a built on dust cover). Well, the Cricut cover went pretty well, so then I felt confident I could do one for the Pazzles; turned out pretty okay. With minimal trauma to my fingers from pin sticks and hard negotiations with my sewing machine, I was on a roll. I made dust covers for all my crafting machines (expect for the Cricut Cake (sold), Cricut Imagine (sold), and original Cuttlebug (to be sold). Some of the dust covers are a little too big but that's okay, the general purpose/use has been achieved and I am satisfied. Now, for the big shot I used a tutorial on You Tube, for the Pazzles and the Cricut I used patterns I found also on You Tube. For the Vagabond, this was actually the first attempt at the Big Shot cover but in all my sewing wisdom, I decide the pattern looked too big, so I cut the fabric more-NOT!!! If you do the Big Shot pattern FOLLOW THE DIRECTIONS ENTIRELY, unless you have some knowledge about sewing (which I do not). So, I didn't want to through it out and since it fit over the Vagabond, I decided to use it. For my Grand Calibur- I tried to follow a little of the concept of the Big Shot pattern or idea. I could have cut the fabric down more on this one (but with the Big Shot nightmare, I decided to leave it). I wasn't sure where the ties at the top should be placed. I placed them too high but it still works, the bottom tie is in a good position- so not too bad for making up my own pattern. The Sewing machine- I tried to follow this ladies basic pattern (the Crafty Gemini) but I have the 160th Anniversary Ed. Singer Sewing machine and the measurements are difficult to get exact. This cover is pretty big but again it works for it's intended purpose and I'm happy!. Check out my handywork...
Today's show and tell... Dust Covers! My original goal was just to make a cover for my Pazzles; however and for no apparent reason I started with my Cricut Expression (that already has a built on dust cover). Well, the Cricut cover went pretty well, so then I felt confident I could do one for the Pazzles; turned out pretty okay. With minimal trauma to my fingers from pin sticks and hard negotiations with my sewing machine, I was on a roll. I made dust covers for all my crafting machines (expect for the Cricut Cake (sold), Cricut Imagine (sold), and original Cuttlebug (to be sold). Some of the dust covers are a little too big but that's okay, the general purpose/use has been achieved and I am satisfied. Now, for the big shot I used a tutorial on You Tube, for the Pazzles and the Cricut I used patterns I found also on You Tube. For the Vagabond, this was actually the first attempt at the Big Shot cover but in all my sewing wisdom, I decide the pattern looked too big, so I cut the fabric more-NOT!!! If you do the Big Shot pattern FOLLOW THE DIRECTIONS ENTIRELY, unless you have some knowledge about sewing (which I do not). So, I didn't want to through it out and since it fit over the Vagabond, I decided to use it. For my Grand Calibur- I tried to follow a little of the concept of the Big Shot pattern or idea. I could have cut the fabric down more on this one (but with the Big Shot nightmare, I decided to leave it). I wasn't sure where the ties at the top should be placed. I placed them too high but it still works, the bottom tie is in a good position- so not too bad for making up my own pattern. The Sewing machine- I tried to follow this ladies basic pattern (the Crafty Gemini) but I have the 160th Anniversary Ed. Singer Sewing machine and the measurements are difficult to get exact. This cover is pretty big but again it works for it's intended purpose and I'm happy!. Check out my handywork...
 |
| Cricut Expression |
 |
| Pazzles |
 |
| Grand Calibur |
 |
| Vagabond |
 |
| Big Shot |
 |
| Singer |
Hugz from Me


