Another tip: To get started with the project, I created a Level
I Challenge Work plan. This helped me to focus
and group the necessary items needed to complete each card. You might end up deviating from or adjusting
your plan a bit, but it will at least keep you on target. By creating a work plan, even with interruptions
to my workflow or limited time to work on the project, I was able to map out
what I could get done, when I could do parts of the project, and at times come
back and pickup where I left off. You
are probably thinking this is supposed to be fun and a “work plan” does not
sound like fun at all. It makes the
project fun because (1) you can envision the end results and (2) the plan cuts
down on confusion, frustration, and anxiety.
You know exactly what technique, colours, stamp set(s), etc. you are going to use. Once I had my plan, I was able to work quickly
through the cards. In following the
work plan, I could look at it and estimate what I could complete each day that I
worked on the project.

For both the card sets I used various Altenew stamp sets and ink families. One of my goals was to use only Altenew products if possible (goal met). Tip: when you are doing a
large project like this one, minimizing manufacturers certainly helps. Familiarity with a manufacturer and their
product characteristics means more consistent outcomes with your project. You know what you can do, on what type of
medium, with whatever product, and the most likely results.
Creating
the female cards
Techniques: Dye Ink stamping
and Stamp Layering

The female cards are a little smaller than the male
cards. The finished size was 4x4 inches.
I started with a card front that was 3 ¾
x 3 ¾ inches. I used 65# (pound) white
card stock for the front panel and card base.
Tip: Even with high quality photo polymer stamps you are going to get
beading from dye inks. The best way to minimize (not resolve) this and to do
less repeated stamping is to use a heavier weighted card stock like #80-#110. I used Altenew’s Crystal Frames to stamp the
geometric shape on the card fronts. Crystal Frames is an awesome stamp set. Altenew has a few good geometric stamp sets all
of which can be used for both male and female cards and projects. This stamp set comes with 14 total stamps, 9
sentiments and 5 multi-jointed geometric shapes. I used Altenew Crisp Dye Inks to stamp the
shapes in the lightest colour in the colour families. For two of the cards I did not use an ink
from the same colour family (the purple and the blue cards), instead I used inks
in the gray families. I just liked the
grays better for those two. I stamped
the branches on the card fronts using the Delicate Cluster stamp set and the Tropical
Forest mini cube set. The Delicate
Clusters stamp set comes with 17 total stamps.
You get 2 long stemmed flower cluster sets composed of 14 stamps, 2
sentiments and 1 connecting word. This is
an alpha-numeric guided layering stamp set which makes it so easy to use. The colour
families I used for the cards were: Pocket Full of Sunshine, Warm and Cozy, Tranquility, Cherry Blossom, Enchanted
Garden, and Delectable Delights. Once
the card fronts were completed, I matched up some scrap cardstock from my stash
to the ink and cut the mats 1/8th larger than the card fronts. I adhered the coloured cardstock to the card
fronts and attached them to the card bases. For the inside of the card, I stamped a
cluster of flowers to match the card front colour in a different position on
each card. And no card is complete
without the matching envelope, so I stamped another cluster on the outside
front of the envelopes. See the links
below for all the supplies used to make this set of cards.


Supplies used for the feminine note cards:
CrystalFrames Stamp Set
DelicateClusters Stamp Set
PocketFull of Sunshine Mini Cube Set
Warm and Cozy Mini Cube Set
Tranquility Mini Cube Set
CherryBlossom Mini Cube Set
EnchantedGarden Mini Cube Set
DelectableDelights Mini Cube Set
RockCollection Mini Cube Set
WarmGray Mini Cube Set
Sentiments for feminine cards:
ObsidianPigment Ink
Friend-Crystal Frames Stamp Set
Birthday-Dotted Blooms Stamp Set
Thanks-Mod Vases Stamp Set
Encouragement-Floral Sprig Stamp Set
Congratulations-Precious Peony Stamp Set
Prayers-Dotted Blooms Stamp Set
PocketFull of Sunshine Mini Cube Set
Warm and Cozy Mini Cube Set
Tranquility Mini Cube Set
CherryBlossom Mini Cube Set
EnchantedGarden Mini Cube Set
DelectableDelights Mini Cube Set
RockCollection Mini Cube Set
WarmGray Mini Cube Set
Sentiments for feminine cards:
ObsidianPigment Ink
Friend-Crystal Frames Stamp Set
Birthday-Dotted Blooms Stamp Set
Thanks-Mod Vases Stamp Set
Encouragement-Floral Sprig Stamp Set
Congratulations-Precious Peony Stamp Set
Prayers-Dotted Blooms Stamp Set
Male Cards
Techniques: Dye Ink stamping, Die Cutting


 |
 |
| Cut the card base 8 1/2 in. x 4 1/4 in. and score on the 8 1/2 in. side at 4 1/4 in to create the card base. Cut 2 pieces of white CS at 3 3/4 in. x 3 3/4 in., cut 1 pieces black CS at 4 in. x 4 in. |
 | ||
Center the die on one (1) of the 3 3/4 in. pieces and tape down with a light tack adhesive such as Washi Tape. Run it through your die cutting machine. Follow the manufacturer instructions to get a deeper embossing. You can save the positive piece for another project or you can use it for the inside of this card.
|

 |
| Center the matching stamp from the Geo Frames stamp set in the center of the die cut area and stamp. A stamp re-positioner is helpful but you do not have to use one. An acrylic block will do. |
 |
| After you have stamped your shape image, you can stamp your greeting/sentiment. For this card I liked the straight lines of this stamp, so I used one of Altenew's 2 x 3 in. sets called Rosie Posy (see link below) |
 |
| Center the card front on to the 4 x 4 in. black piece of CS. I used 1/8 in. score tape. You can use the adhesive of your choice. |
 |
| Center the matted card front on to a 4 1/4 x 4 1/4 in card base. Since I made note cards, the only thing I stamped inside is the geometric image (see earlier images of card inside). |
Supplies used to make the masculine note cards:
Cool Summer Night Mini Cube Set
Gentleman's Gray Mini Cube Set
Warm and Cozy Mini Cube Set
Deep Blue Seas Mini Cube Set
Fall Harvest Mini Cube Set
Sentiments for masculine cards:
Birthday- Floral Sprig Stamp Set
Thank You- Many Thanks Stamp Set
Prayers- Dotted Blooms Stamp Set
Encouragement- Floral Sprig Stamp Set
Friend- Crystal Frames Stamp Set
Congratulations- Precious Peony Stamp Set
* Sentiment for Masculine Demo Card
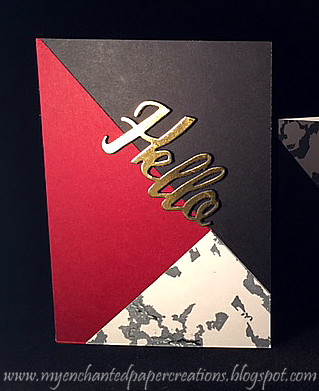
HELLO- Rosie Posy Stamp Set
One last tip (I am sure I will think of more after I post this)- Keep your expectations realistic, remembering life happens! It would be great if we could sit everything else aside and just play in the craft room, but more than likely it's not going to happen. In the program you are going to get sooo many good ideas, you will want to do everyone on every card, you will purchase great products, and you will want to use them all. Just keep it simple, but noteworthy, and most of all remember to have fun.
Warm and Cozy Mini Cube Set
Deep Blue Seas Mini Cube Set
Fall Harvest Mini Cube Set
Sentiments for masculine cards:
Birthday- Floral Sprig Stamp Set
Thank You- Many Thanks Stamp Set
Prayers- Dotted Blooms Stamp Set
Encouragement- Floral Sprig Stamp Set
Friend- Crystal Frames Stamp Set
Congratulations- Precious Peony Stamp Set
* Sentiment for Masculine Demo Card
HELLO- Rosie Posy Stamp Set
One last tip (I am sure I will think of more after I post this)- Keep your expectations realistic, remembering life happens! It would be great if we could sit everything else aside and just play in the craft room, but more than likely it's not going to happen. In the program you are going to get sooo many good ideas, you will want to do everyone on every card, you will purchase great products, and you will want to use them all. Just keep it simple, but noteworthy, and most of all remember to have fun.
 |
| Envelopes for both sets of cards |
The
Muslin bags are simple to construct--sew a sleeve of the muslin, pull it inside out, fold
down the top to create a cuff and tie with Jute. I stamped the shaped images on the bag just
to see how they would look. I did not
seal the stamping onto the bag, so if the bags are washed more than likely the
colour will fade.

 |
| Close up of muslin bag for the female cards. |
On to the next...
Joyce