Showing posts with label Masculine Cards. Show all posts

Tuesday, May 5, 2020

Level I AECP Challenge


OK! let me start this post by saying wow! I finally finished my level 1 Altenew Educator Certification Program (AECP) challenge assignment.  My assignment was to create a male and female set of cards for various occasions to give away as a gift and to create the packaging from some recycled item(s). Both sets had to tie-in with a similar theme. The similarities are they both use geometric images and they are sets of note cards.  I decided to create a set of masculine and feminine notes cards with matching gift bags for each set made from scraps of Muslin I had from a quilting project.   My inspiration for the masculine set of gift cards came from a card I saw in the AECP gallery.  The inspiration for the feminine note cards came from the stamp set insert that I used to make the cards.  The techniques I used from the level I courses where dye ink stamping, stamp layering, and die cutting.   Tip: As I went through the program, I would often go into the previous galleries and I also visited the previous examples of Level I challenge examples to get ideas (think ahead).  I started building my stamp inventory in this way.


Another tip: To get started with the project, I created a Level I Challenge Work plan.  This helped me to focus and group the necessary items needed to complete each card.  You might end up deviating from or adjusting your plan a bit, but it will at least keep you on target.  By creating a work plan, even with interruptions to my workflow or limited time to work on the project, I was able to map out what I could get done, when I could do parts of the project, and at times come back and pickup where I left off.   You are probably thinking this is supposed to be fun and a “work plan” does not sound like fun at all.  It makes the project fun because (1) you can envision the end results and (2) the plan cuts down on confusion, frustration, and anxiety.  You know exactly what technique, colours, stamp set(s), etc.  you are going to use.  Once I had my plan, I was able to work quickly through the cards.  In following the work plan, I could look at it and estimate what I could complete each day that I worked on the project.  


For both the card sets I used various Altenew stamp sets and ink families.  One of my goals was to use only Altenew products if possible (goal met).  Tip: when you are doing a large project like this one, minimizing manufacturers certainly helps.  Familiarity with a manufacturer and their product characteristics means more consistent outcomes with your project.  You know what you can do, on what type of medium, with whatever product, and the most likely results.

Creating the female cards
Techniques:  Dye Ink stamping and Stamp Layering


The female cards are a little smaller than the male cards.  The finished size was 4x4 inches.  I started with a card front that was 3 ¾ x 3 ¾ inches.  I used 65# (pound) white card stock for the front panel and card base.  Tip: Even with high quality photo polymer stamps you are going to get beading from dye inks.  The best way to minimize (not resolve) this and to do less repeated stamping is to use a heavier weighted card stock like #80-#110.  I used Altenew’s Crystal Frames to stamp the geometric shape on the card fronts.   Crystal Frames is an awesome stamp set.  Altenew has a few good geometric stamp sets all of which can be used for both male and female cards and projects.  This stamp set comes with 14 total stamps, 9 sentiments and 5 multi-jointed geometric shapes.  I used Altenew Crisp Dye Inks to stamp the shapes in the lightest colour in the colour families.  For two of the cards I did not use an ink from the same colour family (the purple and the blue cards), instead I used inks in the gray families.  I just liked the grays better for those two.  I stamped the branches on the card fronts using the Delicate Cluster stamp set and the Tropical Forest mini cube set.   The Delicate Clusters stamp set comes with 17 total stamps.  You get 2 long stemmed flower cluster sets composed of 14 stamps, 2 sentiments and 1 connecting word.  This is an alpha-numeric guided layering stamp set which makes it so easy to use.   The colour families I used for the cards were: Pocket Full of Sunshine, Warm and Cozy, Tranquility, Cherry Blossom, Enchanted Garden, and Delectable Delights.  Once the card fronts were completed, I matched up some scrap cardstock from my stash to the ink and cut the mats 1/8th larger than the card fronts.  I adhered the coloured cardstock to the card fronts and attached them to the card bases.  For the inside of the card, I stamped a cluster of flowers to match the card front colour in a different position on each card.  And no card is complete without the matching envelope, so I stamped another cluster on the outside front of the envelopes.  See the links below for all the supplies used to make this set of cards.  


Supplies used for the feminine note cards: 
CrystalFrames Stamp Set
Male Cards 
Techniques: Dye Ink stamping, Die Cutting


The male cards started with 2 card fronts cut to 3 ¾ x 3 ¾ inches.  I centered Altenew’s Geo Frames dies on one set of the card fronts to cut the various shapes creating a window.  I used a thin shim to make sure I got a good embossing on the windows (the negative piece).   I used some temporary adhesive to attach the windowed card fronts to the second set of card fronts.  Then, I used the Geo Frames stamp set in the corresponding shape to stamp the image within the window of the card front.  The Geo Frames stamp set has 4 bordered frames with a combination of sentiments and connecting words, you get 17 stamps in all. The stamps are great by themselves, but If you are looking for a good bundle, this is definitely one to purchase!  Just like the Crystal Frames, you can use this set for both male and female cards.  With the matching dies you can achieve a crisp deep etching for depth and dimension on your projects.  Since I had to make 6 cards, I decided to use 2 of the 4 geometric shapes and repeat them each 3 times but in different colours.  The colour families I used for the male cards are: Black Obsidian pigment ink, Cool Summer Night, Gentlemen’s Gray, Warm and Cozy, Deep Blue Seas, and Fall Harvest.  I followed the same plan for the masculine cards as I did for the feminine cards.  I used some scraps of cardstock in (nearly) matching colours to create a ¼ inch mat and adhered them to a 4 ¼ x 4 ¼ inches card base.   I stamped the same shape on the inside of each card in random places.  I created a matching envelope for each card by stamping the image again on the outside front of the envelope.   


Here is  a little walk through of how to make the masculine cards:


Cut the card base 8 1/2 in. x 4 1/4 in. and score on the 8 1/2 in. side at 4 1/4 in to create the card base.  Cut 2 pieces of white CS at 3 3/4 in. x 3 3/4 in., cut 1 pieces black CS at 4 in. x 4 in. 

Center the die on one (1) of the 3 3/4 in. pieces and tape down with a light tack adhesive such as Washi Tape.  Run it through your die cutting machine.  Follow the manufacturer instructions to get a deeper embossing.  You can save the  positive piece for another project or you can use it for the inside of this card.


Adhere the two (2) pieces together.
Center the matching stamp from the Geo Frames stamp set in the center of the die cut area and stamp. A stamp re-positioner is helpful but you do not have to use one.  An acrylic block will do.


After you have stamped your shape image, you can stamp your greeting/sentiment.  For this card I liked the straight lines of this stamp, so I used one of Altenew's 2 x 3 in. sets called Rosie Posy (see link below)

Center the card front on to the 4 x 4 in. black piece of CS. I used 1/8 in. score tape.  You can use the adhesive of your choice.

Center the matted card front on to a 4 1/4 x 4 1/4 in card base.  Since I made note cards, the only thing I stamped inside is the geometric image (see earlier images of  card inside).
Supplies used to make the masculine note cards: 
Cool Summer Night Mini Cube Set
Gentleman's Gray Mini Cube Set
Warm and Cozy Mini Cube Set
Deep Blue Seas Mini Cube Set
Fall Harvest Mini Cube Set

Sentiments for masculine cards:
Birthday- Floral Sprig Stamp Set
Thank You- Many Thanks Stamp Set
Prayers- Dotted Blooms Stamp Set
Encouragement- Floral Sprig Stamp Set
Friend- Crystal Frames Stamp Set
Congratulations- Precious Peony Stamp Set

* Sentiment for Masculine Demo Card
HELLO- Rosie Posy Stamp Set

One last tip (I am sure I will think of more after I post this)- Keep your expectations realistic, remembering life happens!  It would be great if we could sit everything else aside and just play in the craft room, but more than likely it's not going to happen.  In the program you are going to get sooo many good ideas, you will want to do everyone on every card, you will purchase great products, and you will want to use them all.  Just keep it simple, but noteworthy, and most of all remember to have fun. 


Envelopes for both sets of cards

The Muslin bags are simple to construct--sew a sleeve of the muslin, pull it inside out, fold down the top to create a cuff and tie with Jute.  I stamped the shaped images on the bag just to see how they would look.  I did not seal the stamping onto the bag, so if the bags are washed more than likely the colour will fade.


Close up of muslin bag for the female cards.  

On to the next...

Joyce


Monday, January 20, 2020

For The Guys

A Big Texas Hello!

Today’s card is out of this world!  I don’t know about you but most often my cards are more on the feminine side.  The For The Guys class over at Altenew.com gave us good ideas and inspiration for making masculine cards.   I did a card like the one demonstrated for the class.   What I learned was I don’t have to be so careful and calculated with inked back grounds all the time and still come out with amazing end results.

This card starts off with an A2 piece of white card stock as the card front.  I liked the inked results so much, I used the entire panel, so the final card size is a little larger than a A2.  I used a couple different shades of blue dye inks and some black ink to create my background.  I started by using the lightest blue ink all over my card front.  I added the darker blue ink starting at the edge and about halfway in toward the center blending the two as I went along.  I did this in random places on the card front.  I did not blend the entire card front.  I wanted the blues to blend in some places and keep their individual colour in random spots.  I added the black in around the edges of the card a little heavy and very lightly moved toward the center just covering the blues.  I used my spray bottle to add some water droplets on to the inked background.  Then I took a piece of folded paper towel and pressed down on my background.  This created the faded-out droplet appearance on the card front.  Next, I took a drop of white acrylic paint and a couple drops of water and mixed them together to make a thinned out white liquid.  I used my Tim Holtz splatter brush to splatter the thinned liquid all over the background.  I’m not sure if you can see it but some of the spots have tails which look like comets or shooting stars.  I let the background dry completely.
On some white cardstock, I used first generation stamping with Altenew’s Mini Moon Stamp Set and their crisp dye ink cubes Citrus Burst and Silver Stone to create my moon.  I die cut the moon using the Mini Moon matching die.   Before I attached the moon to the card front, I heat embossed the sentiment from the stamp set on the card front with Versa Mark and white fine detail embossing powder.   I did a little extra on this card by carrying the theme over to the inside bottom of the card.   
For more information on Altenew products, inspiration, and classes click HERE


Altenew Products:


Joyce

Friday, October 25, 2019

Black and White Masculine Gift Card

Good Evening Everyone,
I have been quite busy in the craft room and tonight I want to share a gift card holder that I am did for a craft group swap I have tomorrow. I did a couple versions of this gift card holder not too long ago. I used the tutorial by Ginger from My Sisters Scrapper, you can find it here. This time I did a masculine version. It was really pretty easy to put together-only 2 colors of cardstock (CS) and 1 color ink! I just love how they turned out. To make this gift card holder I used Michael’s Recollections brand Black and White CS (65#), Stampin’ UP! (SU) 5/8” black satin ribbon (retired), and SU Stamp set called “One Wild Ride” (retired). I made the tag using a Graphic 45 tag and my Brother Scan N Cut (BSNC). The Graphic 45 large tags only come in ivory, black, and kraft and I needed white! Soooo, I scanned the tag image into my BSNC and now I can cut the tag shape out in any color I want. I can even add the large eyelet (1/2”) if I want (I did not for this project). I also used my BSNC to make the borders around each of the die cuts.  The Harley-Davidson sign is a prop I made on my Cricut Maker. Lawdy, I love, love, love my machines!!!  I had to make 10 gift card holders for the swap (no gift cards added). Here are a few pictures of the finished masculine gift card holders. Until next time, happy craftin’.


The way the light is shining on the cardstock, it looks as if I used 2 different blacks.  In person the color is correct.


I am going to enter my gift card holder in the following challenges: 
Creative Fingers Challenge Blog, #173 Anything Goes
Crafting with an Attitude, #56 Anything Goes
Krafty Chicks Challenge Blog, #478 Gift Packaging or Tags
Southern Girls Challenge, Anything Goes


Joyce

Thursday, May 31, 2018

Graphic 45 Father's Day


Hello All,
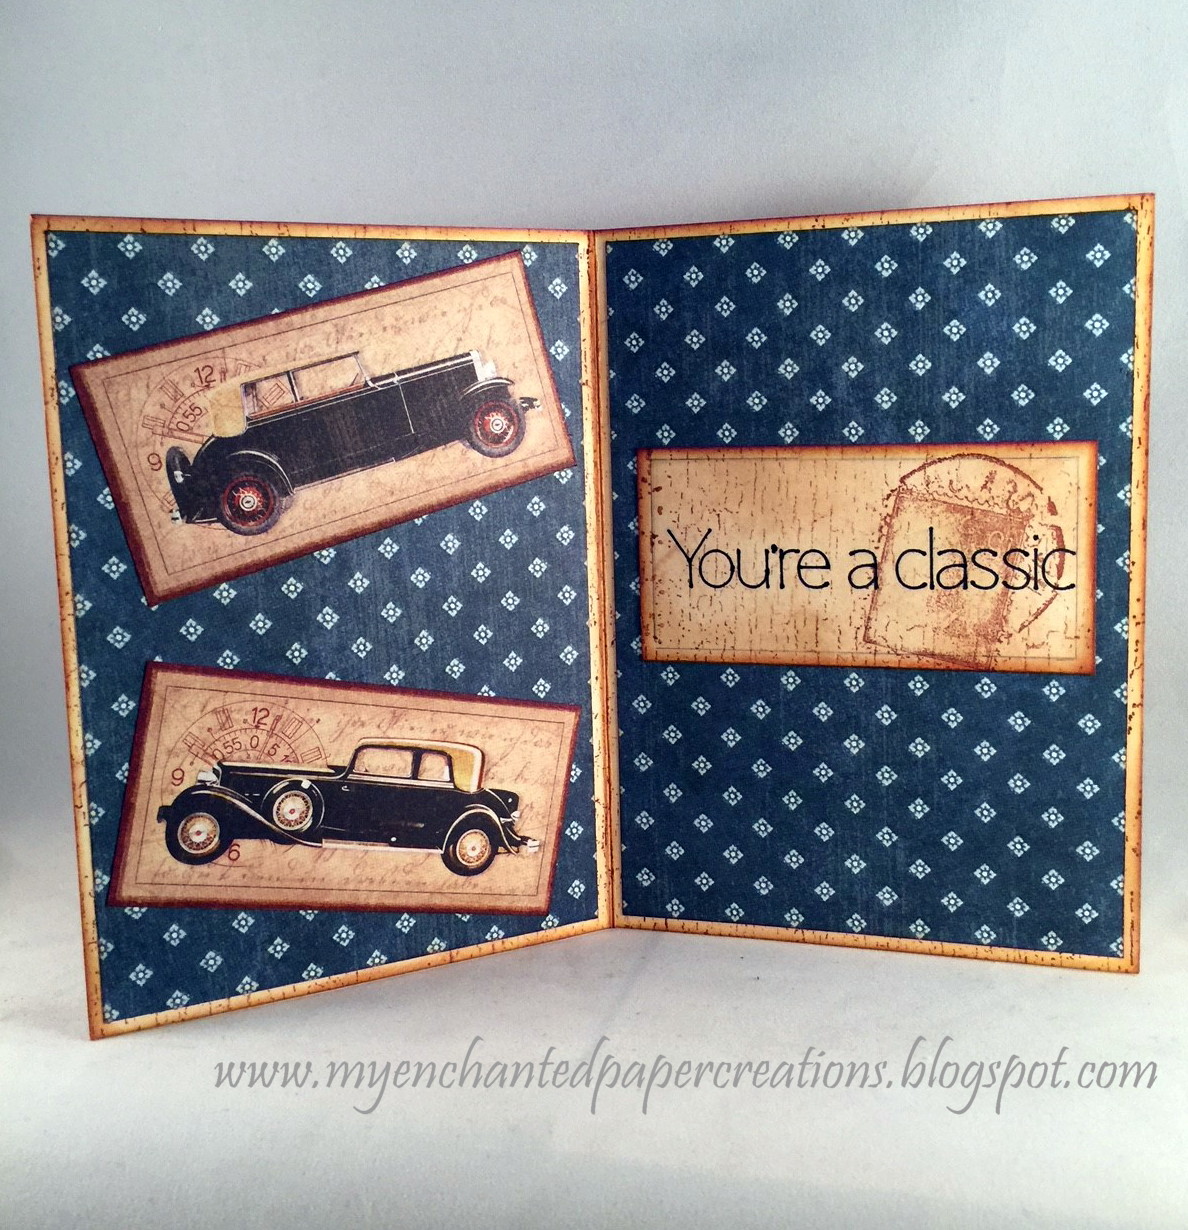
I am hoping this will be a quick post today.  I say that and then my story goes on and on.  I decided to try a different approach to blogging about the posts.   I am just going to post the card recipe and the photos to see if this will cut down on the wordiness; we’ll see how it goes.  Today, I am sharing my June Eclectic Ellapu (EE) design team inspiration card.  The theme for the June EE challenge is “Anything Goes”.  Last month for the challenge I did a Mother’s Day card.  So for this month it’s time to celebrate all those incredible papas and papas to be!    Happy Father's Day to all those amazing men who allow us to do what we love to do...lol!!!
Card recipe:

Title/Theme:  Happy Father’s Day, “You’re a classic”
Tutorial/Video:  N/A

Category:  Masculine card, Father’s Day
Finished size: A6 (4 ½” x 6 ¼”)

CS: Michaels #110-Cream    

Patterned Paper/CS:   Graphic 45 A Proper Gentleman Collection; The Sophisticate #4500181
Flowers/Greenery:  N/A

Ink (s):  Tim Holtz Distress Inks-Scattered Straw, Antique Linen, and Vintage Photo.    
Marker (s):  Cricut pen-Black 0.4, Copic Mark E13                         

Embellishments:   Tim Holtz Alterations Findings-Pen Nibs
Stamp/ Set(s):  Hampton Arts, (#DF2610), “French Post”, JustRite Cling Crackle Background Stamp (#CL02127)

Adhesives:  ATG runner, Glossy Accents
Punches:   N/A

Die(s): N/A
Tools (other):  Fiskars Paper Trimmer, Martha Stewart Score Board, Polar Block (sanding block), Tim Holtz Ruler, pencil, blending tool, craft mat
Misc.: Cricut Air 2


Joyce


Friday, December 15, 2017

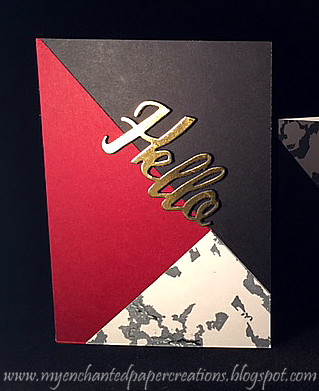
Waffle Flower Marbled Masculine Card


Hello Everyone,

I hope your day is going well.  Just under two weeks before the greatest day in the world…My Jesus’ Birthday!!!  Whoop-Whoop, go Jesus, go Jesus!!!  Given the focus of the season, I thought this would be a perfect opportunity to try a layering technique using Waffle Flower’s Marble Stamp Set to make a masculine set of cards.  I saw this on Channin’s You Tube channel, you can find it here.  As usual I started with 110# (white) card stock.  My card base started out at a A2 size but to make sure all the sides were nice and even, the finished cards ended up being 3 ½" x 4 7/8".  I used some Stampin’ UP! Cherry Cobbler card stock scraps and some (Michael’s) black cards stock scraps.  I used the Waffle Flower Marble stamp set to make the marble look on the cards.  To stamp the images I used Momento’s  Flannel Gray, London Fog, and Tuxedo Black.  I used Spellbinders Die-D Lites for all the greetings.  I cut each die out 4 times, one of which I foiled using my Heidi Swapp Minc Machine and the other 3 I stacked together to create the dimension and then glued the foiled piece on top.   I created small white envelopes for each card.   The insides are blank.   FYI: This is a really cool stamp; however, this is not the most user friendly stamp.  All the videos I watched about the stamp do their best to make it easy to use by giving as many tips and tricks as they can. There is also some instruction sheet I saw on the internet but the stamp set (at least mine) did not come with those instructions.  I had a great deal of problems lining up some of the images, especially D3…ugh!!!  I almost gave up on that piece but I kept practicing until I got one that I could tolerate.  So, I am saying this to say just be patient.  Luckily, I wasn’t in a hurry and could take my time.  All-in-all at the end I was pretty okay with how my cards turned out.   I would still encourage you to give it a try.


Joyce
Related Posts Plugin for WordPress, Blogger...