Friday, November 30, 2018

2018 Christmas Tags


Hello and Happy Holidays!!!

I just love this time of the year.  I especially love seeing all the inspiring holiday cards and projects.  This is the last challenge for 2018 from Eclectic Ellapu and the theme is ANYTHING HOLIDAY FESTIVE, so let’s go out with Hyped Holiday Spirit! Goodness knows it’s been an extremely challenging year here in the states and all over the world.  This holiday season let peace and love be our driving force into a prosperous new year.   

For my project what better way to get this party started than by prettying up those holiday packages? I decided to do some frosted tags for my crafting group (shout out to the Texas Divine Diva’s).  I did a tag for each member in our group.  

I was inspired by a YouTube video from Wplus9 Design, which can be found here Messy Heat Embossing with Dawn ft Merriest Snowflakes

I used Wplus9’s basic concept but I modified the project a little by cutting out each of the sentiments 3 times and gluing them together to give them dimension.    I inked and foiled the tag and the snowflakes manually. 

Here are a few photos of my finished tags:


HAPPY HOLIDAYS!


Supplies:

White card Stock
Light Blue Card Stock

Silver Glitter Ribbon
Bo Bunny Snowflakes (acrylic stamp set)

Tim Holtz (new) Snowflake Dies (both)
Glitter Embossing Powder

Sizzix Holiday Sentiment Dies (I and II)
Tim Holtz: Broken China, Faded Jeans, and Black Soot

Tim Holtz Bigz Tag Die
Silver Foil

Bonus Tag:

White Card Stock
Antique Gold Glitter Embossing Powder

Paper Crimper (yep still got it… the old blue and orange one…lol)
Hero Arts stamp and die set Merry Christmas

3M Foam Tape
Bo Bunny Snowflake (acrylic stamp set)

Gold Foil


Gold and White trimmed ribbon

Wednesday, October 31, 2018

A Magnolia Thanksgiving

Hello Everyone, just dropping in to tell you about the November challenge over at Eclectic Ellapu.  This months theme is "Thanksgiving".  My project represents the harvest for Thanksgiving.  There are 2 pull outs to attach a gift card to or to send a picture.  You can even attach some lighter coloured plain cardstock for a sentiment.

This is a double pocket card I did a while ago.

Supplies:
Scarecrow Magnolia
Copic Markers
Paper from my stash
Stampin' UP! Expresso Satin Ribbon
Eyelets
Petaloo Sunflower stem
Spellbinders Labels

Thanks for stopping by, I hope you'll join us this month!

Joyce

Sunday, September 30, 2018

Fall Carnival


Hello Everyone and welcome back!  It is Fall and I am lovin’ it!   The Eclectic Ellapu theme for October is “FALL”.  So let’s see all those beautifully created fall projects. Your project does not have to be a card; it can be anything related to fall as long as it is wonderfully created by you!!!   For my design team project I did some Fall Carnival Treat Bags with the help of my awesome Cricut Maker!  I am also participating in the Sweet Treats Collaboration on YT hosted by Tonya aka Memory Lane Keepsakes on YT.  Thank you again to Tonya and the Sweet Treats Teamers for allowing me to join in this month.  If you would like to check out projects from the Sweet Treat team members see the links below.  Well, enough of my jibber-jabber; I’ll let you check out some  photos of my finished project.   Til’ next time…


Sweet Treats Collaboration Team Members:


Neshia: Inspiring beautiful creations: https://www.youtube.com/channel/UCEDR-hL_sFCO7uGxdUshu_g  


Lisa: happycrafter Lisa Goss: https://www.youtube.com/channel/UCq20JEKMYD7XNQZpKan106A    


Latasha: Sassy Crafty Taz 101 King: https://www.youtube.com/channel/UChIypw516hbqVyLfiwDAUlQ 

Loretta: Creativity at a glance 777: https://www.youtube.com/channel/UC41IinnlKZ75A-0cXGhmz4A


Thelma:  Thelma's Creations and More: 

Robin: Craftsiheart: https://www.youtube.com/channel/UCzE352diKGGSaR-Bf5P2PXg 


Participant
Joyce: Joyce O
 https://www.youtube.com/channel/UCa8eLEP3A668pxNB1usNrWQ


Joyce

Friday, August 31, 2018

Easy Gift Card Holder


Good Day to my Crafting Friends,
Just popping in to tell you all it's time for the next challenge over at Eclectic Ellapu.  This month's (September) theme is "ANYTHING GOES"!!!  I decided since the most "wonderful time of the year" is fast approaching; I would give you all a little motivational idea...Gift card holders!!!  This adorable little gem can be used for gift cards or money.  I found the tutorial on YouTube, check out Ginger from My Sister Scrappers tutorial here.  Hope to see your fabulous "Anything Goes" creation in the challenge.  Here are a few photos of my gift card holders.


Here are the supplies I used to make these little cuties:
Title/Theme:  Graphic 45 Gift Card Holder
Tutorial/Video:  Graphic 45 Botanical Tea Easy Gift CardHolder  
Category:  Gift Card Holder
Finished Size: approximately 4” wide x 3 ¾ “ (to the crown)
CS: N/A    
Patterned Paper/CS:   Graphic 45’s Botanical Tea, A Proper Gentlemen, and Couture paper collections
Flowers/Greenery:  Green rose (my stash)
Ink (s):   Tim Holtz Vintage Photo (the A Proper Gentlemen only)
Marker (s):   None                         
Embellishments:   Very Vanilla Silk 5/8th ribbon, Lime Green ¼ “ribbon, and Teal Seam Binding ½” , chipboard pieces and tags from the paper collections.
Stamp/ Set(s):  None
Adhesives:  Mono Adhesive, ATG, and Hot Glue
Punches:   None
Die(s):  Graphic 45 Large Tag die

Happy Crafting, Joyce

Tuesday, July 31, 2018

Our Daily Bread Designs-Armor of God


Hello crafty friends!

Here is a quick post to let you know about the August challenge at Eclectic Ellapu.  The August challenge is geared toward friends.  We want to you show us something you made for a friend within the last 12 months; it doesn’t have to be a card.   It just so happened that I had a friend who was going through a very difficult time, so I sent her this card of encouragement.  I wanted to remind her to keep her faith as our Lord and Savior ALWAYS has her back…praise HIM all the time even in the mist of our trials.   Praise HIM for what HE going to do in your life even when you can’t see it… 
See you in the challenge…


Supplies used to create this card:


Title/Theme:  Armor of God

Date: 6/2018
Tutorial/Video:  N/A

Category:  Encouragement Card
Finished Size:  American A2  4 ¼ x 5 ½

CS:  Recollections 110# White CS, Stampin’ UP! Real Red CS, JoAnn’s Charcoal Gray #65 CS
Patterned Paper/CS:  N/A

Flowers/Greenery:  N/A
Ink (s):  Ranger Archival Ink-Watering Can

Marker (s): Copic Markers                               
Embellishments:   N/A

Stamp/ Set(s):  Our Daily Bread Designs-Armor of God image and sentiment, background stamp- 2014 Stampendous- R223 Leather Flowers
Adhesives:  ATG, Tombo Mono Adhesive 

Punches:   N/A
Die(s): Our Daily Bread Designs-Suit of Armor Die (CBD207)

Misc.: Clear Wink-of-Stella Pen
 

Saturday, June 30, 2018

Patriotic Banner


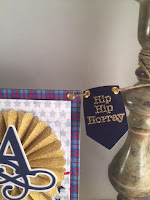
Alrighty Folks, it is July and time for you-know-what…  Another craf-tac-ular challenge over at Eclectic Ellapu!  July’s theme is one of my favorites… Red, White, and Blue (love me some U-S-to-the-A baby!!!).  I have been wanting to do a banner for a while and what a splendid time to make it happen.  This was another fun project that did not take a long time.  I hope you will join us this month for the Red, White and Blue bragging rights challenge.  Looking forward to seeing your inspiring creations.  Have a happy and safe 4th of July.


Supplies for this project:


Title/Theme:  Red, White and Blue
Tutorial/Video:  N/A

Category:  Dimensional Project, Banner
Finished Size: Each bunting is 3 ½ x 5 ½

CS:  Navy Blue, White, and DCWV “Glitzy” Glitter Cardstock Stack   
Patterned Paper/CS:   Our Daily Bread Designs “Stars and Stripes “and “Old Glory” 6x6 Paper Pads, DCWV Glitzy Glitter Cardstock Stack

Flowers/Greenery:  N/A
Ink (s):  N/A 

Marker (s):  N/A                             
Embellishments:   N/A

Stamp/ Set(s):  Our Daily Bread Designs “American Hero”
Adhesives:  Tombo Mono Adhesive

Punches:  1 ¾ “circle punch 
Die(s):  Spellbinders A Gilded Life “Baby Buntings”, Tim Holtz “Mini Rosettes”, and Die’sire’s “Bunting Trio”

Tools (other): Tim Holtz Ruler, Craft Knife, Tim Holtz Craft Pick, Crop-A-Dile, Heating Tool, Hot Glue Gun, scissors

Die Cutting Machines: Cricut A2, Sizzix Big Shot
Misc.: low tack adhesive, mini eyelets, Jute, Versa Mark, Judikins “Egyptian Gold” embossing powder, “Storybook Cartridge”

Joyce Ann
 

Thursday, May 31, 2018

Graphic 45 Father's Day


Hello All,
I am hoping this will be a quick post today.  I say that and then my story goes on and on.  I decided to try a different approach to blogging about the posts.   I am just going to post the card recipe and the photos to see if this will cut down on the wordiness; we’ll see how it goes.  Today, I am sharing my June Eclectic Ellapu (EE) design team inspiration card.  The theme for the June EE challenge is “Anything Goes”.  Last month for the challenge I did a Mother’s Day card.  So for this month it’s time to celebrate all those incredible papas and papas to be!    Happy Father's Day to all those amazing men who allow us to do what we love to do...lol!!!
Card recipe:

Title/Theme:  Happy Father’s Day, “You’re a classic”
Tutorial/Video:  N/A

Category:  Masculine card, Father’s Day
Finished size: A6 (4 ½” x 6 ¼”)

CS: Michaels #110-Cream    

Patterned Paper/CS:   Graphic 45 A Proper Gentleman Collection; The Sophisticate #4500181
Flowers/Greenery:  N/A

Ink (s):  Tim Holtz Distress Inks-Scattered Straw, Antique Linen, and Vintage Photo.    
Marker (s):  Cricut pen-Black 0.4, Copic Mark E13                         

Embellishments:   Tim Holtz Alterations Findings-Pen Nibs
Stamp/ Set(s):  Hampton Arts, (#DF2610), “French Post”, JustRite Cling Crackle Background Stamp (#CL02127)

Adhesives:  ATG runner, Glossy Accents
Punches:   N/A

Die(s): N/A
Tools (other):  Fiskars Paper Trimmer, Martha Stewart Score Board, Polar Block (sanding block), Tim Holtz Ruler, pencil, blending tool, craft mat
Misc.: Cricut Air 2


Joyce


Saturday, May 5, 2018

Hero Arts Magnolia Flowering Stamp Sympathy Card


Howdy everyone,
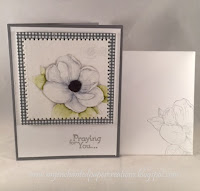
Today I am sharing this quick sympathy card I made for a friend who’s life partner passed away.  This stamp serves as a constant reminder to all of us that nothing, not even the next minute is promised to us and that we should enjoy our love ones and the beauty that surrounds us daily.  Too often we focus on the tragedies that befall someone instead of praising God for today’s journey, his love, his mercy, his blessing…

To make this 4 ¼ “x 5 ½ “card I used some light gray and white cardstock from Michaels.  I made the patterned paper using some white cardstock, Memento “Gray Flannel” ink, and a Wendy Vecchi Gingham Background Stamp. The Magnolia stamp is from Hero Arts “Flowering Magnolia”.  I adhered the Magnolia image to the patterned piece and mounted that on some 2mm white fun foam.  I coloured the Magnolia stamp using Zig Clean Color Real Brush Markers and touches of Copic Markers.  I used Kooh-I-Noor Bristol Smooth multi-media paper for my water coloured image and paint bushes #0,2, and 6.  I stamped a faint image of a postage stamp in the top right corner using JustRite Cling stamp set “Greetings From Paris”. I cut the Magnolia image out using a Memory Box “Postage Square Layers” die.  The patterned paper is cut out using Spellbinders Card Creator 6”x6” Matting Basics B dies.  The sentiment and greeting are from a Stampin’ UP! Stamp set called “Thoughts & Prayers”.  I stamped it in Versa Mark and heat embossed it using Silver fine detail embossing powder.

Thanks for stopping by and don’t forget to enjoy every moment…


Joyce Ann
 

Monday, April 30, 2018

Altenew Build-A-Flower Rose Mother's Day Card


Hello everyone and thank you for stopping by,
This year feels like it’s just rolling away.  I can’t believe it’s May already and time for another super fantastic bragging rights challenge over at Eclectic Ellapu.  This month’s challenge is near dear to us all because we celebrate our amazing Mothers.  Whether your mom is still here or gone on and hopefully at peace, it’s always a great opportunity to show how much our moms are appreciated and thought of often.  For my design team project, I wanted to keep it very traditional, soft and simple.   I made a 4 ¼ x 5 ½ tent-fold card using the Altenew stamp and die set Build-A-Flower:Rose.  This set is just amazing!  You can make some of the most beautifully detailed roses and leaves.   To make this card, I started with some #110 white card stock for the base and the front panel.   I used some regular old #65 cardstock to stamp the layered rose.   I think from now on I’m going to start using Neenah Classic again.  Although my roses came out beautiful, I think using a better quality paper will make them even better.  I suggest you use whatever is cost effective for you.  As you can see, using the #65 card stock worked just fine.  The sentiment is an old JustRite Clear stamp set-“All in The Family Large Sentiments”.  The sentiment is stamped on Spellbinders “Savory Labels” die.  I used Versa-Fine ink to do all the stamping.  I added a small touch of clear Wink-of-Stella to some areas of the rose and the leaves.  I finished the outside of the card with some very old clear drops. For the inside again, I wanted the card to be very simple, so I stamped Happy Mother’s Day and added a piece of vellum (adhered with Vellum Tape) over the top of the sentiment.  I popped the flower up on foam tape as well as the sentiment.  I made a coordinating pink envelope to go along with the card. I love how it turned out.  I hope you enjoy it and give it a try. My card was inspired by Amanda at Lolli Lulu Crafts; you can watch her YouTube video here.  This is one of the best videos I’ve seen for using Altenew’s layered stamps.  Amanda makes it look so effortlessly!  I used all the colours of Altenew inks in the video (the littlecubes).  The only colour I did not have was the “Evergreen”, so instead I used Tim Holtz’s Forest Moss and it was perfect. Well, until next time…Happy Mother’s Day to all the moms and mom’s to be…
Joyce Ann,
 
Sorry for the crazy glare but this was the best photo to capture the sparkle from the Wink-of-Stella.


Sunday, April 22, 2018

Gorjuss in Water Colours


Hello Everyone,
I am back with a simple tent fold card.  I was trying my hand at water colour painting.  It’s something that I’ve really wanted to get into but it just seemed so messy or disorganized. Over the years I’ve tried water colouring with Stampin’ UP! Ink pads, Tim Holtz Distress Ink pads, Tim Holtz Distress Markers.  I have to say, not a big fan of the water colouring using water colour paints at all!  And the use of water in an open container in my craft space is not a good thing for my mind.  More than likely, the water will get spilled and everything in the vicinity will be ruined!  If it’s not due to my tremors, it will be because I’m as graceful as a bull in a China Shop…lol.  I see a lot crafters and artist using the water colour paints and they make it look so easy.  I purchased some Michaels (Artist Loft) inexpensive water colour paints to give it one more try.  They were on sale for $5, so I bought the regular water colour paints as well as the shimmer (never even used the shimmer, I am sooooo over the paints period).  I thought if I don’t like them (and I did not), I haven’t loss that much and I could always donate them.   I like to blend colours and even with the 18 colours that come in the paint set, it just was not working in my mind.  It could be that I had already shut it out before I got started.  I think I was more focused on the messiness, spilling water, over saturating the paper, getting those paper fibers, etc.  I used some paper from the Bee Paper Company.  The package says Heavyweight Vellum Drawing, 90lbs (g/m2).  I saw a YouTube video and someone used this paper to do their water colouring.  For my project the paper held up pretty well.  I forgot to weight the paper down to get rid of the buckling after it dried, so I had a little difficulty getting it down on the patterned paper and you can feel a little of the buckling on the finished card.   I used one of the Gorjuss Girl stamps, #9-You Have My Heart.  It turned out okay but the water paints are just is not for me.  I did however, finish the image and the back ground and did not want to waste the effort so I turned it into a card.  The greeting and the sentiment are from the Mama Elephant Scripty Birthday stamp set.  The card base is some old DCWV textured card stock, the patterned paper is also extremely old paper from ColorBok (8x8 paper pack) called Antique Paperie, and I used a piece of white card stock for the inside sentiment panel, and I used a Copic Liner Pen to ground the image. The finished card size is 5 ½ x 5 ¾ inches.   Again, not a fan of the water coloured paints but I thought I would share my experience and the end product of my feeble attempt at water colouring using paints.   You can purchase Mama Elephant at Simon SaysStamp or on the Mama Elephant website You canjust about purchase a Gorjuss Girl stamp anywhere now but here is the official site for Santoro London (makers of Gorjuss Girl).


Til’ next time, Joyce
 
 
Related Posts Plugin for WordPress, Blogger...