Showing posts with label Spellbinders. Show all posts

Sunday, May 3, 2020

Hello Friend

Hello All,
Just popping in to say hi and share a card I did for a crafting group I belong to.  I hope everyone is well and keeping the faith.  It's like a delayed Spring thaw in Texas.  This past Friday, stores and other businesses began to open.  We are still following the health and law enforcement guidelines related to COVID-19 but people are getting out.  I am hoping that the spirits of the people will continue to rise.   Hear our prayers LORD...

The challenge theme for this card was Red, White, and Blue!  The best flag colours I do believe!     However much I love those colours, it is was a little tough for me to come up with a card idea at first.  I didn't want to do a military card because I want to save those ideas for later in the year.  It just so happened that I found a stamp company that has been around for sometime, but I just did not jump on board.  I've had a couple of their stamps sets from when I first started stamping but again, I was busy with something else and forgot all about them.   I happened to be looking for something on YouTube and came across one of their videos....and she was hooked again.   The company is called Rubber Stamp Tapestry.  You can either Google Rubber Stamp Tapestry or go to pegstamps.com.   You can also check out their YouTube channel here.  Their stamps make some really beautiful cards.  I really love stamps that do the work for you. 

I did a single layer (stamped directly on the card base), 4x4 inch Friend card.  The card base is 110# Neenah Classic Crest Solar White card stock.  The images are from Rubber Stamp Tapestry stamp set-Little Posy Basket.  I used Tim Holtz Distress ink colours Gathered Twigs, Fired Brick, Faded Jean, and Bundled Sage.  To achieve the lighter green for the sprigs I used second generation stamping.  To ground the basket I used Copic markers W3, W1, and W00.   The sentiment is from the Altenew stamp set Mini Atlas.  This is a 2 x 3 inch photo-polymer stamp with 3 total stamps, an image of the continents and 2 sentiments.  The sentiments were just perfect for this little card.  The sentiment was stamped with Altenew's Obsidian Black pigment ink.   To get the heart shape, I stamped the basket first, then I used a Spellbinder's Classic Heart Etched Die and lightly traced the outline of the heart around the basket.  After I was done stamping I used my electric eraser (purchased on Amazon) to remove the pencil trace.  I love, love, love these stamps!

Til next time...


Joyce

Sunday, March 8, 2020

Card of Faith...HE is my rock...


A Card of Faith
Easter (my favorite holiday) is on its way, Glory to God in the highest!  This year I thought I would share some cards to hopefully inspire a renewed devotion to Christ and his message of repentance, forgiveness, love, and alms giving. 

This is an image I coloured a long time ago.  I was just keeping up my Copic colouring skills.  You can quickly lose it if you don’t use it.  It turned out so well I put in my stash.  I kept saying to myself I’m going to make that into to a card one day.  It has been a least 2 years and today was the day that I was moved to make a card.  Nothing fancy, just a card of faith because I know someone will need it.   I coloured the image so long ago, I don’t think I wrote down which colours I used.  If I can, I will list them down below or at least the colours I remember.  It’s been so long; I don’t remember if it was a stamp or a digital image.  I know the cardstock is Neenah Classic Crest Solar White (at least 80#).  

Today, to complete the image, I added a sentiment from the Prima stamp set “Creating in Faith” by Jamie Dougherty and brought in some dept using Copic Markers colours W3, W1, W0, W00.   I popped the focal image up on 3M Foam Tape and used Spellbinders Triple Floral dies for the frame.  The card front is mounted on a 4 ¼ x 4 ¼ white card base.  The inside of the card is empty for now.   I created a plain white envelope using my We R Memory Keepers punch board.   Thanx for stopping by and until next time…

Copic Colours:

Rose: R59, R46, R29, R27, R24
Crucifix: E49, E59
Leaves: can’t remember
Crucifix Binding: Gelly Roll Gold
Sentiment: Gina K, Amalgam Ink


Glory to you Lord,
Happy Lent.
Joyce

Monday, April 30, 2018

Altenew Build-A-Flower Rose Mother's Day Card


Hello everyone and thank you for stopping by,
This year feels like it’s just rolling away.  I can’t believe it’s May already and time for another super fantastic bragging rights challenge over at Eclectic Ellapu.  This month’s challenge is near dear to us all because we celebrate our amazing Mothers.  Whether your mom is still here or gone on and hopefully at peace, it’s always a great opportunity to show how much our moms are appreciated and thought of often.  For my design team project, I wanted to keep it very traditional, soft and simple.   I made a 4 ¼ x 5 ½ tent-fold card using the Altenew stamp and die set Build-A-Flower:Rose.  This set is just amazing!  You can make some of the most beautifully detailed roses and leaves.   To make this card, I started with some #110 white card stock for the base and the front panel.   I used some regular old #65 cardstock to stamp the layered rose.   I think from now on I’m going to start using Neenah Classic again.  Although my roses came out beautiful, I think using a better quality paper will make them even better.  I suggest you use whatever is cost effective for you.  As you can see, using the #65 card stock worked just fine.  The sentiment is an old JustRite Clear stamp set-“All in The Family Large Sentiments”.  The sentiment is stamped on Spellbinders “Savory Labels” die.  I used Versa-Fine ink to do all the stamping.  I added a small touch of clear Wink-of-Stella to some areas of the rose and the leaves.  I finished the outside of the card with some very old clear drops. For the inside again, I wanted the card to be very simple, so I stamped Happy Mother’s Day and added a piece of vellum (adhered with Vellum Tape) over the top of the sentiment.  I popped the flower up on foam tape as well as the sentiment.  I made a coordinating pink envelope to go along with the card. I love how it turned out.  I hope you enjoy it and give it a try. My card was inspired by Amanda at Lolli Lulu Crafts; you can watch her YouTube video here.  This is one of the best videos I’ve seen for using Altenew’s layered stamps.  Amanda makes it look so effortlessly!  I used all the colours of Altenew inks in the video (the littlecubes).  The only colour I did not have was the “Evergreen”, so instead I used Tim Holtz’s Forest Moss and it was perfect. Well, until next time…Happy Mother’s Day to all the moms and mom’s to be…
Joyce Ann,
 
Sorry for the crazy glare but this was the best photo to capture the sparkle from the Wink-of-Stella.


Wednesday, February 1, 2017

With Love...

Hello everyone,
      We are back for the start of the new year with our first challenge of 2017 at Eclectic Ellapu.  Our February challenge theme is "Anything Goes".  This is a great way to start off your challenge year.  It's a jump start for those creative juices to start flowing!!  Remember our challenges are for bragging rights, so come strut-your-stuff and join us! 
      For my DT inspiration I choose to do a "Loaded Envelope with a Wand.  This is the latest crafting craze on You Tube.  I just learned about it a week or so ago and thought I would give it a try.  There are several tutorials on You Tube on how to construct the envelopes and the expandable envelopes.  There are small loaded envelopes and large envelopes and all kinds of decorating ideas.  And, if you are like me and love numbers, once you get the concept you can apply it to make your envelope as large as you want.  Additionally, it seems most of the envelopes have a "Wand".  I have to say, I wasn't that thrilled about the Wand thingy but once I was done with the envelope; it looked like it was missing something???  After I put a little Wand in the envelope package, it really made a difference.   Like the envelope there are many, many Wand ideas and tutorials on You Tube.  The easiest tutorial I found for the Loaded Envelope was by Laura from The Vintage Key. Laura does a tutorial for the large expandable envelope.  Tmika from Scrapdaworld does a great tutorial on the Mini Loaded Envelope (the tutorial is at the end of the show-n-tell).   Here is a wand tutorial from Erica at Scrapdiva29 and if you want to make heart rosettes (sooooo cute!) you can look at Sheshe's tutorial .  Oh yes and there are many tutorial on just the envelope (without the expandable part and pockets), I could not find a good one; I'll leave that one up to you.   Til' next time, here are a few pictures of my February project.


Here are a few pics of the demo hearts and then I made one for the Loaded Envelope Topper, cute ey??


I took this picture before I made the Heart Rosette. I loaded this baby up with Prima products, bling, ribbon, mini clothes pins, charms, blank cards...yummy stuff.

I used Spellbinders border dies to make the pocket edges and mats, the poker-dot card is a little greeting card (blank)

I made a wand and tried to make it sparkle by using some Jelly Roll Gel Pen

This is the back of the envelope I put in 3 blank card with envelopes, the recipient can use or give away.

Joyce


Saturday, March 12, 2016

Spellbinders Majesty die Shaped Card

Hi everyone,
     Today I am sharing a card I did with Spellbinder's Majesty die S4-445.  I love this die, it's so, so pretty!  There are just a wonder of ideas and possibilities with this die.  I was inspired by a card I saw in the JustRite booth at the last Craft Expo I attended. The card I saw was actually a baby card.  I plan to do the baby card eventually.   I used scraps to do this first run card.   Just making sure I'm able to line up the templates correctly and making note of any adjustment needed for the real card!  The card measures about 4.25" x 4.25".  The supplies  I used are JoAnn's pink cardstock, the white cardstock is my go-to source Michael's Recollection brand, and  the patterned paper is some old scrap; can't eeeeeeeven remember the name.  The little multicolored rose is from an old Prima collection called Sherwood Rose Cottage. The 1/8 inch satin ribbon is a scrap from a previous project.  I punched the butterfly out of vellum paper (Recollection brand), and added some (Wilton) sparkling stamen and some Crystal Stickles from Ranger.  The little tag is from Spellbinder's Framed Tags One S4-392, the "Thanks"  is from JustRite  All in The Family Large Sentiments CR-04400, and the ink is Stampin UP! Blushing Bride.  Hopefully, in few days I can start on the real thing.  I plan to enter this card in the following challenges.  Thanks for stopping by, til next time...Hugz from me!

Alphabet Challenge Blog- A for Anything Pink
Crafting with Friends- Challenge #16 Anything Goes
Creative Fingers Challenge- Challenge #104 Anything Goes
Fussy and Fancy Challenge #159- Anything Goes with Wings
PDE Linky Party- Challenge #114 Anything Goes
Polkadoodles Crafting -Week 10 challenge-Spring Color
Simply Papercraft Challenges- Challenge #25 Anything Goes


Tuesday, March 1, 2016

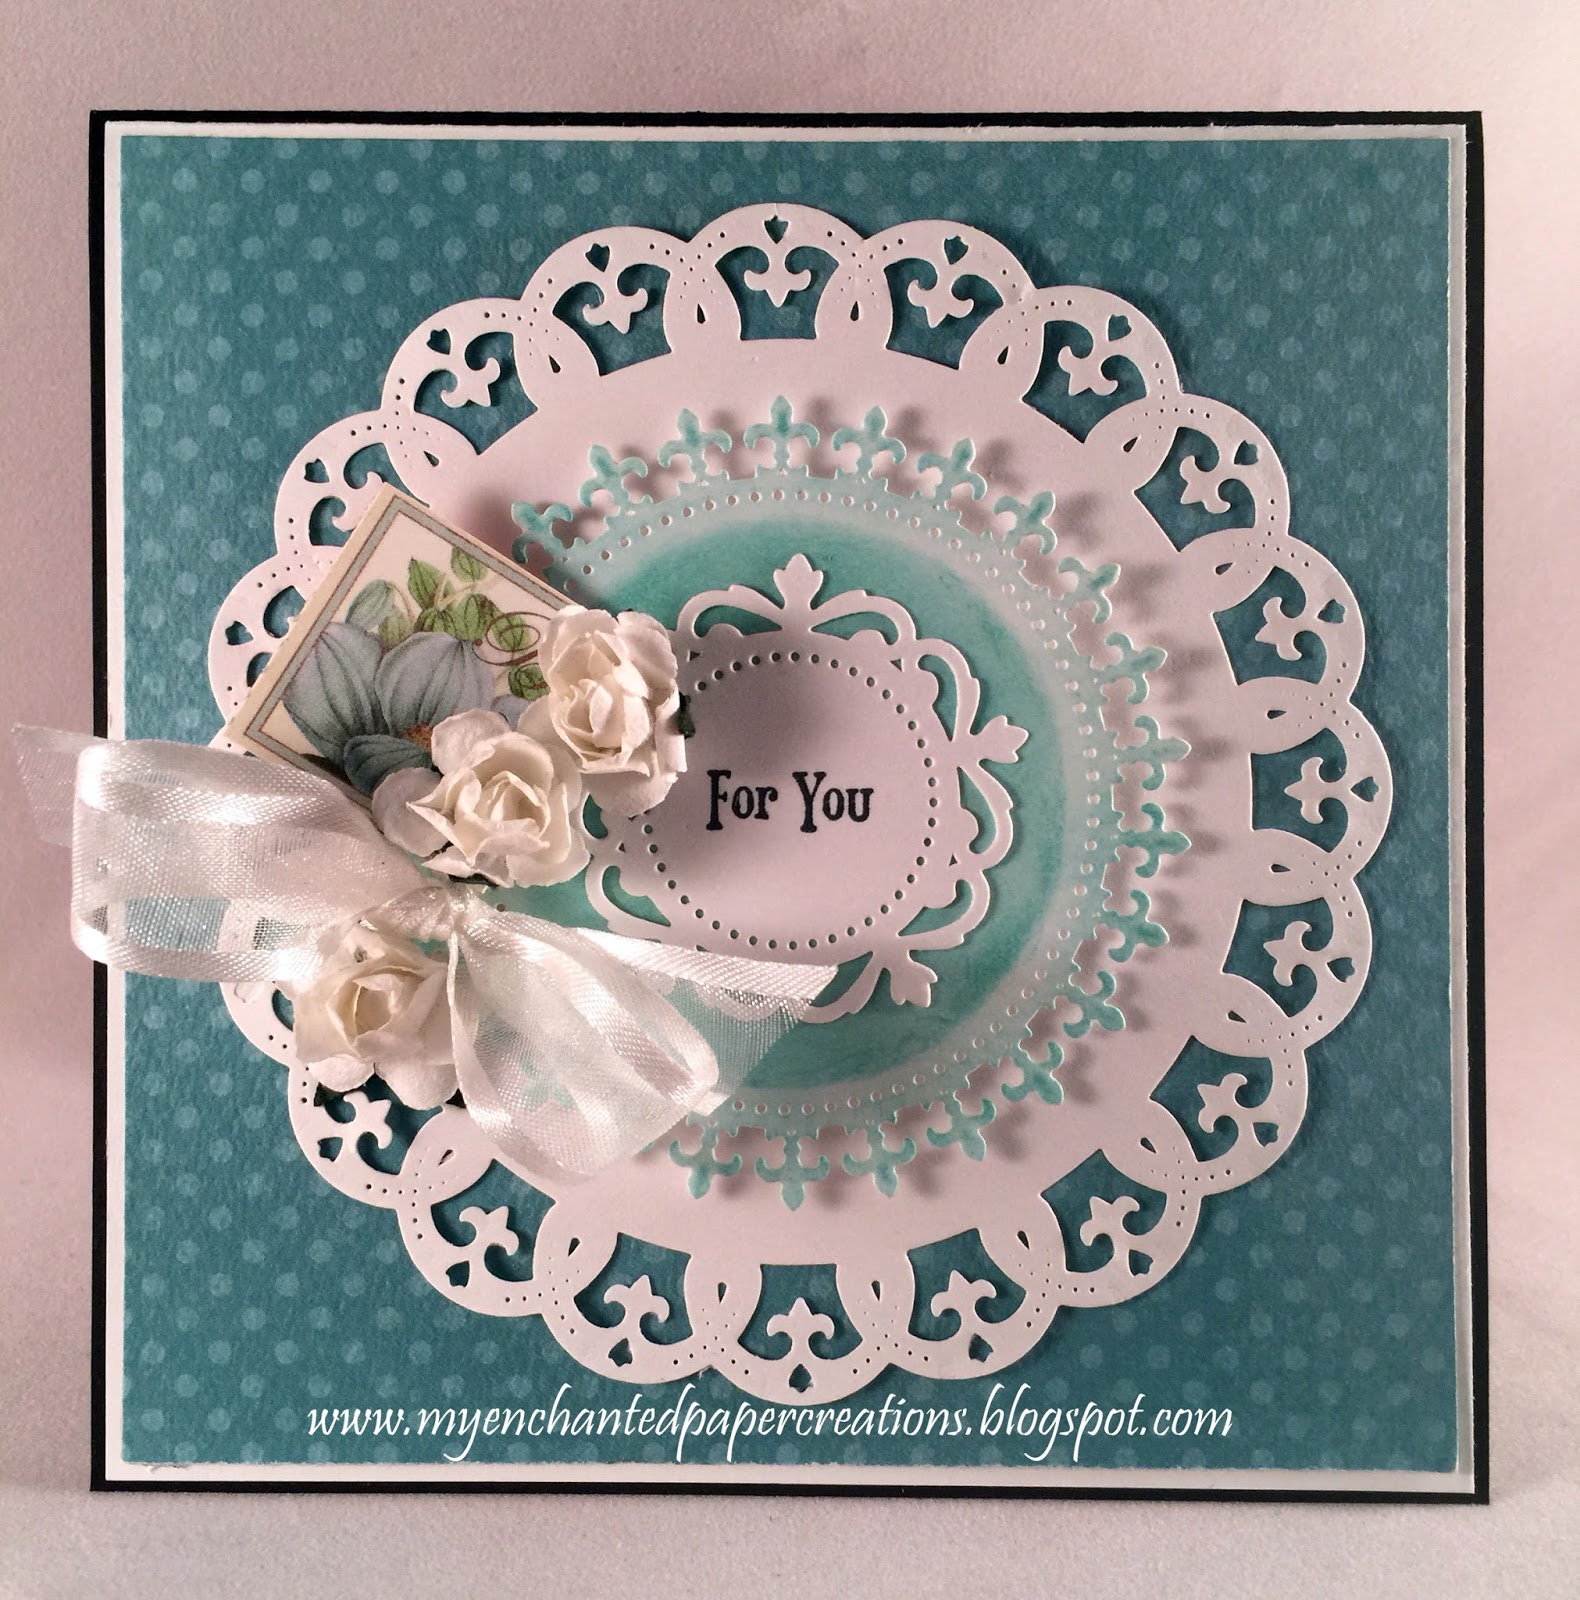
For You! Spellbinders Royal Circle die templates

Hello my paper craftin' peeps!

Just popped in to share a card that I did while doing some test cutting from new dies that I recently acquired.  I do a lot of big projects and usually I have more than one going at a time.  Sometimes you need a little break in between the big projects;  so what better time to get in a quick card or two to break up some of that repetition and monotony.   Most often I get my card ideas from Google images or Pinterest.  This time I decided to look even closer for some inspiration.  I got this card idea from the die packaging!  It looked like such a simple and fun card to make.  The supplies I used for this card are: Spellbinders Royal Circle S4-444, black and white card stock- Michael's Recollection brand, the bluish-green poker-dot patterned paper is from BoBunny, the ink is Stampin UP! Pool Party and Momento Tuxedo Black, the greeting is a Stampin' UP! Vintage Labels stamp set , the little white rose buds are Hobby Lobby brand, the little stamp embellishment is a cut apart from Graphic 45 Botanical Tea, and the sheer ribbon is from JoAnn's.  And what's even better... all the items are SCRAPS! love it!!!  I'm not a scrapbooker;  but I'm still scrappin' bebey!(lol)  The inside is blank with a white piece of cardstock for a personal message or a stamped sentiment. This little 5 x 5 inch card is just great for almost any occasion and right on time for Easter and Mother's Day!  I am going to enter this one in the following challenges:

Artistic Inspirations Challenge Blog #151 Anything Goes
Craft-Dee BowZ March challenge Anything Goes and include a handmade bow (code CBD35)
Craft Your Passion Challenges #301 Always Anything Goes
Crafty Cardmakers #156 For a Special Woman
Dream Valley Challenges #126 Mother's Day

Have a look, hope to see you there, and good luck in the challenges!


Friday, January 22, 2016

Happy Paper Crafting New Year!

Hello everybody,
     Well (big sigh)...It's a new year. Another year we are blessed beyond measure to be able to create and share new and incredible paper goodies.  I was just thinking, the first month is almost gone and I haven't blogged a thing! Oh my! I decided I'd better get going, if I planned to meet my goal of blogging at least once or twice a month. Though I haven't blogged since November 2015, I have been a busy lil' bee.  If it's not my actual job of being a medical review nurse, then I've been busy in my crafting studio (yes, I've changed from calling it a lab to a studio...sounds more chic-lol).   Hmmm (tapping my chin)...let's see... I've made several cards using dies from my favorite folks Spellbinders, I've watched a lot of Becca from Amazing Paper Grace video's and made some of her cards, I finished one of at least five mini-albums to scrap my European vacation memories, I've played with my Minc Machine (thank you to my Scrappin BFF Lesia from Mema's Crafts), and today I finished a folio album tutorial by Ginger Ropp of My Sister Scrapper...whew!   So, the folio is actually my first project started and completed for 2016.  I'll show you the cards that I worked on first and then I'll do later a post for the folio.

The first card I cased from Becca Feeken, it uses her Lacey Tiers die, Spellbinders Times Rectangles, Foundations Victorian Iris (color) card stock, Recollections Cream 110# card stock, Spellbinders Nested Lacey Pennants, Recollections gems stones/brads, Wild Orchid Flowers, cream seam binding, greeting is from JustRite Stampers "Ever After Antique Labels One", sentiment is from Stampin' Up stamp set "God's Blessings" (this one may be retired), foam tape, and ink is by Stampin Up Bordering Blue (retired).


This card was inspired by Lesia from Mema's Crafts.  Unfortunately, I'm not sure where she got the idea or layout from. In this card I used Spellbinders Heirloom Legacy die, Heartfelt Creations "Burst of Splendor" 12 x 12 paper pad, Recollection cream cardstock (110#), greeting is JustRite Stampers' Large Fancy Sentiment, the sentiment from Ki Hampton Art, no name but the catalog number is SC0585,the ink is Stampin Up's Mossy Meadow (new color) #133645, and some foam tape. 


Card #3 was inspired by Marisa, who also used Becca Feeken's Lacey Tiers.  Additional products I used for this card are: Want-2-Scrap pearls, Stampin Up Very Vanilla satin 5/8" ribbon (retired), Wild Orchid Craft Ivory Cherry Blossoms, Textured Green card stock from JoAnn's, Recollection cream card stock (110#),  Prima patterned papers from an old 12 x 12 pack called "Fairy Flora", the greeting and sentiment are from Crafty Secrets "Card Sentiments Large", foam tape, and the ink from Stampin Up Mossy Meadow  #133645.


Moving right along, I have another inspired card.  This card was done as a shape card on Pinterest.  I'm not big on shaped cards; although, I will do one every now and then. I didn't like it as a shaped card, so I decided to add a rectangle base.  I also wanted my inside finished.   I used Spellbinder's Radiant Rectangles, baby pink textured card stock from Recollections, White 110# card stock from Recollections, Stampin Up Blushing Bride/Pretty in Pink inks, Wild Orchid Craft flowers rose buds, foam tape, and JustRite Stampers "Ever After Antique Labels One" clear stamps. 


Okay, well that's it for now.  I hope you enjoy the cards, Til' next time,
Hugz from me!
(Joyce Ann)


Thursday, June 25, 2015

Another Note Card Set and a Shaped Card

Hi y'all,
     Quick post ( I say that every time don't I??).  Finished a couple quickie projects this week that I want to share.  First is a note card set using Spellbinders A2 Valiant Honor die . I am only showing one of the cards (the demo) because I didn't like the way the picture of the set came out (so just imagine 4 more just like the one in the photo below).  I used SU Almost Amethyst card stock and Almost Amethyst classic ink, Recollections white card stock, and Spellbinders Font One - Upper Case.  To glue down all the fine areas I used a Zig 2 way glue Squeeze & Roll pen.  I followed Becca's tutorial, though I had to do a few modifications.  Since they are note cards and I wanted to be able to mail them; I left off the fluff (pearls) and I didn't bother making the box.

 
     Next, is my cute (if I do say so myself...and I do) little shape card.  I am not big on shape cards at all but I really like this die and thought it made a lovely little card.  I used Spellbinders Labels Forty-Two and Labels Forty-Two Decorative Accents dies, SU (2014-2016 In-Colors)  Lost Lagoon classic ink pad and coordinating card stock, the cream card stock is from JoAnn's, the patterned paper is an old Webster's Pages 6x6 pack that had samples from 3 different paper packs (Spring Market, Yacht Club, and Country Estate), the dark green card stock (used leaves) is from my stash, the leaves were punched using the MS rose leaf punch, the rose buds are from Hobby Lobby, the greeting/sentiment stamp is from Crafty Secrets "Grand Greetings", and I popped the center piece up on some mini foam squares.


Both of these were really quick and very simple cards.  On the "Should I try this Project Scale" I give both an easy to medium minus.  Once again, basically the dies do all the heavy work.   
 
Til next time...hugz from moi
 

Thursday, June 18, 2015

Box with Note Cards set

Hello my crafty friends!
     Today, I am sharing a  little box that I saw on Becca's site Amazing Paper Grace. Her box is just stunning!  I decided that I would do a demo box first (before I jack-up some good card stock).  So I kept my colours really simple and used as much scrap cardstock as I could.  I followed Becca's tutorial on YouTube, you can check it out here. This project also gave me an opportunity to play with my bow maker. The pale greenish-blue card stock is some faux suede paper I have had in my stash for years. The white cardstock is Recollections, the ink is SU Pool Party, the ribbon is from our local specialty craft store Big Mouth Scrappers (Forney, TX) hi ladies!!! The dies I used were Spellbinders Arched Elegance and Arched Elegance Pocket.  I used Scor-Tape for the box construction and my ATG to adhere the panels. The background stamp is my favorite SU stamp "En Francais".  I believe the background stamp is long since been retired but you might be able to find it out there on EBay, Craig's List...one of those type places.  You might even check with a local SU (Stampin' Up!) Demonstrator, they may be able to help you hunt one down (caution it may be a bit pricey).  The cards are really elegant.  The inside of the note card has a liner that is partially attached. You can catch a glimpse in one of the side view photos.  I really like how it turned out.  Now I can make it for-real-real (lol). It took me about 2 hours in total including watching the video and pre-cutting all the pieces.   If I had to say the ease of making this project would be a medium.  The most challenging part is the box lid.  Give it a try!

Until next time...


Hugz from Moi


Tuesday, June 16, 2015

Getting in The Spirit with Spellbinder Nested Stars

Howdy folks!
   Just dropping in to share a quick and cute little card I just made.  This is a plain and simple A2 card with a blank inside.   I used JoAnn's and Michaels cardstock, SU Poppy Parade Classic Ink Pad, SU retired stamp set  Perfectly Penned, Spellbinders Stars, Spellbinders Belly Band 2, a Gelly Roll White Gel pen for a little faux stitching.   I saw a similar card on the internet some years ago and kept thinking I wanted to make this card.  Well of course I didn't write down the artist name or the website.  I searched all over today, looking for that card but could not find it.  I could not find a tutorial on how to line up the stars (somebody needs to really get on that). I just kept thinking about it, cut several demos trying to get it right and finally it clicked!  Thank goodness, I was getting tired and this was supposed to be a 30 minutes to 1 hour card.   When I actually figured it out, the card took less than 30 minutes to cut and put together.   Now that I have the concept down, maybe I'll try it using some patterned paper.  This would be a great graduation card layout.  And...If you have the patience of Job, you can do these as invites to a 4th of July celebration.  Now, I'm thinking about all the other nesties dies I can use with this technique!    I hope you give it a try.   Here's my attempt.

 
Hugz from Moi!
  
Related Posts Plugin for WordPress, Blogger...